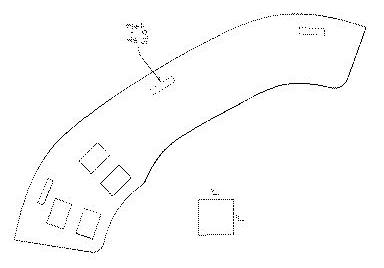


If you wish to make your own mini dash, here's how to do it. You will need:

Start by printing out the above image. This is a tracing of the prototype dashboard. Using a copier, or your printer, adjust the printout size so the 1" square is the correct size. This will fit on 8.5x11" paper with about a half-inch border. Roughly cut out the template, leaving space around the outline. Then, spray glue the template to a piece of 0.090" aluminum plate. Thicker plate may be used, but I wouldn't recommend going thinner. Then, simply cut out with a bandsaw/jigsaw, and sand or file to the final contour. The slots will be a little more difficult without a mill, but can be drilled and filed out to size. The four large cutouts to the left are for the type of switches I used, but you can arrange anything you want on there. Note that about 3/8" of the leading edge will be under the bottom edge of the windshield, so check your desired cutout locations before actually cutting metal.
The three 3/16 x 3/4" slots are used for the mounting tabs. For these, you will need three pieces of 3/16 x 3/4" aluminum bar stock, about 1" long (this is pretty flexible). These fit through the slots so they are flush on the underside, and are then welded in place. If you can't get the welding done, it may also be possible to epoxy them in place. Make them a little longer, so you can poke some excess past the underside of the dash and get a good fillet of epoxy. If you do this, the tabs should stick up 7/8" from the upper side of the dash. You could also try aluminum brazing rods, which are used with a propane torch. I have not tried these.
Once the tabs are mounted, you'll need to mark the mounting holes. Remove the windshield from the bike, and place it up against the tabs on the dashboard (as shown in the photo). The dash should be centered with the windshield. Mark the locations of the mounting holes as accurately as possible on the aluminum tabs. A helper may be useful here. Remove the dash, and drill and tap the holes for your mounting screws. The original screws will not quite be long enough.
Now that you've finished your dashboard, click here for ideas on what to mount to it.